


Physical eSIMs/adapters aren’t complicated—they’re ideal for people who switch 2–3 lines or travel long-term. Before buying, confirm phone support (iPhone XS or recent Android), carrier compatibility and fees; check Settings for “Add eSIM.” Compare prices carefully to avoid overspending and stay safer.
What Makes a Good Physical eSIM Adapter?
Not all eSIM adapters are not designed equally; some operate effortlessly, while others are nothing but aggravating paperweights.
| Feature | Plug-In Adapter | Adhesive Adapter | Notes |
| Design | Fits in SIM tray like a standard SIM | Sticks to existing SIM | Plug-in is bulkier but sturdier |
| Reliability | Strong and durable, easy to troubleshoot | May fail if adhesive wears out | Plug-in more dependable |
| Speed | Handles 4G/LTE, 5G support may be available but not essential | Same, but performance may vary | 5G useful only if coverage is strong |
| Profiles | Can usually store multiple carrier profiles | Often fewer profile slots available | At least 10 recommended |
| Battery Use | Minimal power draw | Minimal power draw | Not a concern overall |
| Build Quality | Well-reviewed brands last longer | Cheaper units prone to failures | Always check warranties and reviews |
In short, plug-in eSIM adapters are generally the safer choice, offering better durability and reliability, while adhesive types may trade off convenience for longevity.
Where to Buy Physical eSIM for the Best Deal
Intelligent shopping allows for significant cost reductions on purchases of Physical eSIM.
Official Stores
Purchasing directly from manufacturers is always more expensive upfront, but comes with better support. Large organizations such as Google, Samsung, and Apple sell Physical eSIM solutions in their stores. It's important to note that these physical eSIM adapters are generally manufactured and sold by third-party specialists, not directly by phone manufacturers like Apple or Samsung. Prices are higher, but customer service is reliable.
Carrier stores are another possibility. They will usually include eSIM adapter costs in your monthly plan, sometimes making them more affordable long-term.
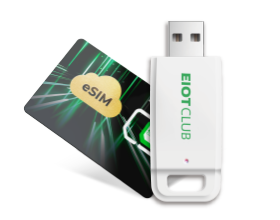
Specialty Vendor: Eiotclub
Eiotclub sells a physical eSIM card that lets you download and manage multiple eSIM profiles via its app (useful for travel across 200+ destinations), plus accessories like an eSIM reader for quick activations. You can buy directly on their site or via Amazon; choose the official store for first-party support or Amazon for fast shipping and easy returns. Always check device compatibility and the available country profiles before purchase.
Online Platforms
Amazon, eBay, and other online electronics stores sell eSIM units at competitive prices. It is advisable to be very vigilant in selecting sellers; however, select ones with thousands of positive feedback and hassle-free return policies.
Best Buy and other physical stores will allow you to look at things first before purchasing if it is something you never used.
Price Range
Entry-level adapters are relatively affordable, mid-range options balance cost and features, while premium units can be quite expensive. The sweet spot is usually mid-range devices that offer enough functionality without overpaying for extras you may have never used.
Keep in mind there may also be ongoing costs such as activation or service fees, depending on the provider.
How to Set Up a Physical eSIM
Android – Quick Setup Guide
Step 1: Insert the Physical eSIM Card
Insert the physical eSIM card into your phone’s SIM tray. For most Android phones, use SIM Slot 1 for the best compatibility. Reinsert the tray and restart the phone if it does not recognize the card automatically.
Step 2: Install the EIOTCLUB App
Open Google Play, search for “EIOTCLUB”, download the app, and complete registration/login.
Step 3: Add Your eSIM / EID Information
Open the EIOTCLUB app, go to the SIM/eSIM management section, and add your eSIM card or EID number (printed on the card or packaging). Follow the prompts to bind the card to your account.
Step 4: Select and Activate an eSIM Profile
Inside the app, choose the data plan or eSIM profile you want to use, then tap to activate. Wait for the status to change to “Active” or “Connected.”
Step 5: Confirm Connectivity
On your phone, go to Settings > Network & Internet / Connections > SIMs/Mobile networks, make sure mobile data is turned on for the EIOTCLUB line, and check the signal icon. Open a webpage or map app to confirm that data is working.
Tips (Android)
- Prefer SIM Slot 1 when possible.
- If there’s no signal, toggle Airplane Mode on/off or restart the device.
- Check APN settings if mobile data doesn’t work; follow the APN info provided in the app or on the card packaging.
iPhone (iOS) – Quick Setup Guide with Card Reader
Step 1: Access the Card Reader Setup Page
Using your computer or iPhone browser, visit the SIM card reader setup page from your manual. Download and install the required software/app for the card reader.
Step 2: Insert the eSIM Card into the Reader
Place your physical eSIM card into the card reader as shown in the manual, making sure the gold contacts face the correct direction.
Step 3: Download the eSIM Profile
Open the EIOTCLUB eSIM Reader app/software, select the card reader, and start the download process.
- Choose the eSIM profile you want.
- If needed, use “Scan Image File” or a QR option to load the profile/QR code provided with your card.
Step 4: Enable the eSIM Profile
Once the profile is downloaded, check its status in the EIOTCLUB eSIM Reader app and enable it (for example, by tapping the ICCID or “Enable” button in the bottom corner).
Step 5: Insert the eSIM Card into Your iPhone
Remove the eSIM card from the reader, insert it into your iPhone’s SIM tray, and close the tray gently.
Step 6: Complete Setup in iOS
On your iPhone, go to Settings > Cellular (Mobile Data) and locate the new eSIM line.
- Make sure it is turned on.
- Choose it as the default line for data (and for calls/texts if you want).
Step 7: Test Your Connection
Check that your iPhone shows signal bars and a data icon (4G/5G/LTE). Open Safari or another app to make sure you can access the internet. You can manage your plan, usage, and future top-ups directly in the EIOTCLUB app for ongoing connectivity.
FAQs about Physical eSIM
Q1. What if My Physical eSIM Stops Working on a Trip?
Most failures are software-related. Restart your phone, or remove and reinstall the adapter. For serious hardware issues, a replacement may be needed locally. Always carry a backup SIM, and check if travel insurance covers tech failures.
Q2. Can I Use One Adapter for Many eSIM Lines?
Yes, a single adapter can manage several eSIM lines as long as your phone supports storing multiple profiles. The adapter handles activation, but your phone decides how many can stay active at the same time. Most iPhones allow one physical SIM and one active eSIM, while Android models vary. You can switch between stored profiles anytime even if only one or two can run simultaneously.
Q3. Are Physical eSIMs Secure?
Yes, generally safer than traditional SIMs due to strong encryption and harder cloning. The main risks come from account access—protect your carrier and email accounts with strong passwords and two-factor authentication.
Make Your Choice Today
Although eSIMs and eSIM adapters are not perfect devices, they solve real problems for the right customers. Don't overanalyze it—if you're juggling multiple phone lines or an overseas traveler more often than twice a year, their convenience is absolutely worth money.
Begin by verifying phone and carrier support today. When both are confirmed to support it with your configuration, choose a mid-range eSIM adapter from a trusted seller with good reviews. You'll be asking why it never happened sooner.